How to Change a String on an Acoustic Guitar
A detailed, step by step process demonstrating how to correctly change the string on an acoustic guitar.
-
Step 1: Get the Proper Tools
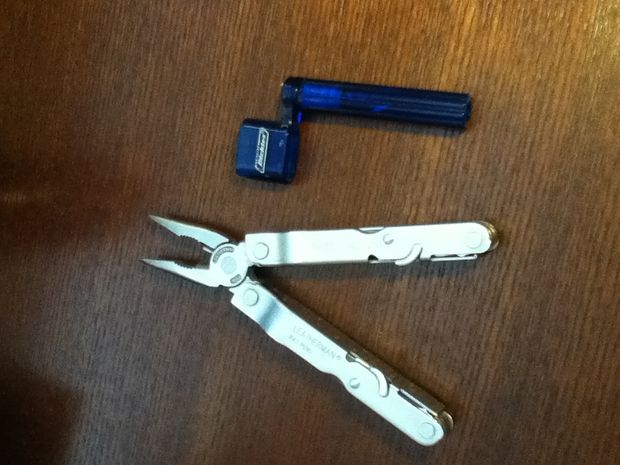
1. Changing the string on a guitar is a simple, straight-forward process, but there are a few tools that will make the changing process much quicker and easier. The tools you will need are a pair of wire cutters, pliers, and a peg winder.
*Note: It is possible to change the string without these tools, but it is much more difficult and takes longer. You also run the risk of poking your fingers with the sharp wire.
2. You will also need the correct replacement strings for you guitar. These can be purchased at most music stores.
*Note: Make sure you purchase acoustic guitar strings if you have an acoustic guitar. The strings are fairly similar in construction, but the sizes will be different and will not match the original strings as well.
-
Step 2: Removing the Broken String
1. Lay the guitar on a flat, yet soft surface (to avoid scratches to the guitar). Begin by using the pliers to unwind the broken piece of wire from the tuning peg.
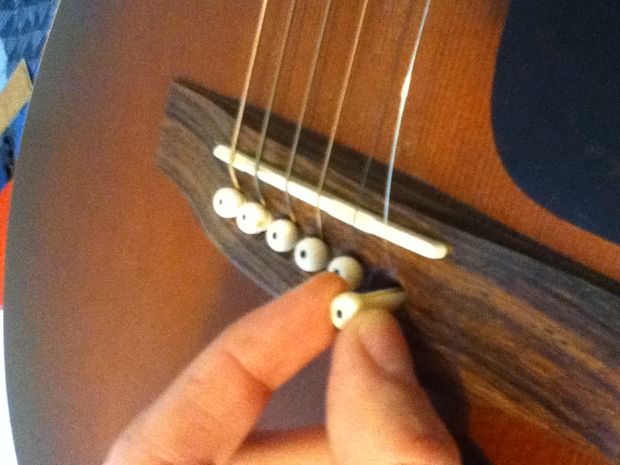
2. Follow the other half of the broken string down to where it connects to the bridge of the guitar. Here, there will be six white pegs that go into the guitar body. Pull out the peg that holds down the broken string. You may need to use the pliers to remove the peg.
3. After removing the peg, you will be able to pull out the other half of the broken string. Notice that this end of the string has a ball or ring shaped end.
-
Step 3: Connecting the String to the Bridge
1. Retrieve the new strings and select the correct replacement string.
*Note: The strings usually come is packs of six; each string is a different size and replaces only one of the strings on the guitar. Consult the packaging to determine which string you will need. The strings are arranged from largest diameter to smallest diameter on the guitar.
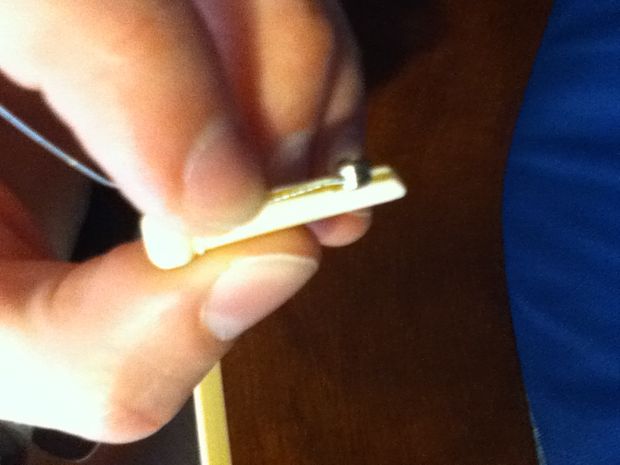
2. After selecting the correct string, place the end with the ring or ball into the hole where the peg went. Only insert the string 1 to 1.5 inches into the hole.
3. Align the groove on the white peg so that it faces the string and insert the peg into the hole. The end of the string is held in place by friction, so it is important that you do not insert the string end too far down before replacing the peg, because the string end will often get caught on the bottom of the peg. This causes the peg to come out when the string is tightened. In order to remain in place, the string end must be wedged between the peg and the bridge body so that when the string is tightened, the string end becomes more firmly wedged against the pin.
-
Step 4: Connecting the String to the Tuning Peg
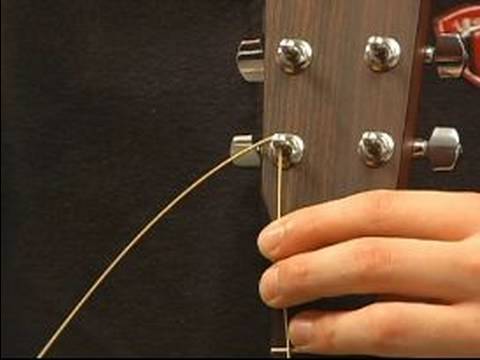
1. Take the free end of the replacement string and thread it through the corresponding peg.
*Note: If the pegs on the head of the guitar are arranged in a symmetrical formation, thread the replacement string so that it wraps from the center of the guitar head towards the outside as the peg is tightened. This means that the string unwinds from the side of the peg that is toward the center of the head. If the guitar has the tuning pegs that are all on one side, the replacement string should be threaded so that it remain as straight as possible before wrapping around the peg. This helps the guitar tune more accurately.
2. Once the replacement string is threaded from the correct direction, make sure there is enough slack in the string to create several windings around the peg before the string is tight. You should have enough slack to pull the string about six inches away from the guitar before beginning to wind.
3. Once you have the correct amount of slack, bend the replacement string so that it makes a 90 degree angle on the center-facing side of the tuning peg. Doing this will also help the guitar tune more accurately.
-
Step 5: Tightening the String
1. Insert the string through the tuning peg until the 90 degree bend reaches the surface of the tuning peg. Maintain a slight tension on the side of the replacement string that is attached to the guitar body and begin turning the tuning key.
*Note: Make sure the replacement string winds/unwinds on the side of the tuning peg that keeps the strings as straight as possible.
2. The replacement string should make one complete coil on the tuning peg above the thread hole, and the remainder of the coils should be below the thread hole of the tuning peg. Use the peg winder to speed up this process by inserting it over the tuning key and turn it like a music box crank. Continue tightening until the string makes a noticeable note when plucked.
*Note: DO NOT over tighten the string with the peg winder. It can tighten the string faster than you realize, and you may break the string if you do not check it periodically while winding. To check the tightness of the string, make sure it does not play a higher note than the string next to it.
-
Step 6: Trimming the Extra String

1. Take the pair of wire cutters and carefully cut off the extra replacement string from the tuning peg. Cut the wire as close to the tuning peg as you can, but be careful not to scratch the guitar with the cutters.
2. Bend the short but sharp wire stub downward (towards the guitar head) using the pliers. This completes replacing a string on a guitar. You can now tune the string to its proper tension and begin to play.
*Note: Since the string is new, the string will stretch a little as you play, so you may find that you need to retune the string once or twice more until it stretches to its final length
Valote
( Collectibles: instructables)